|
JavaXT
|
|||
Compiling 64 bit applications using Visual Studio 6Believe it or not, it is possible to build a x64 bit application using Visual Studio 6! The key is getting a copy of the February 2003 Edition of the Windows Platform SDK. In this article, I will outline the steps I took to get my app compiled and built for x64 editions of Windows XP, Windows 7, Windows 2003.Step 1: Download the February 2003 Edition of the Windows Platform SDKThe February 2003 Edition of the Windows Platform SDK is apparently the last edition of the SDK compatible with Visual Studio 6. Unfortunately, the old MS Platform SDK is no longer available as a single package from Microsoft. You will have to either order it for $10 from MS, or download the parts and build the install yourself. To build it yourself, download the files from the below links into the same directory.
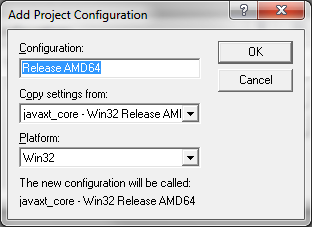
Run the batch file that is in the directory, and it will build the install. After doing this, you can either install the SDK directly, or burn it onto a CD so you will have it for later and install from there. Step 2: Install the Platform SDKThe next step is to install the Platform SDK. Note that you do not need to use the setup.exe in the root of the SDK installer directory - this is merely a splash page and requires IE. Instead, go to the "setup" directory and run "CoreSDK-x86.msi". This will include the required libraries for x64. Note that the "-ia64" installers are for Itanium 64 bit machines, and will not run in x64.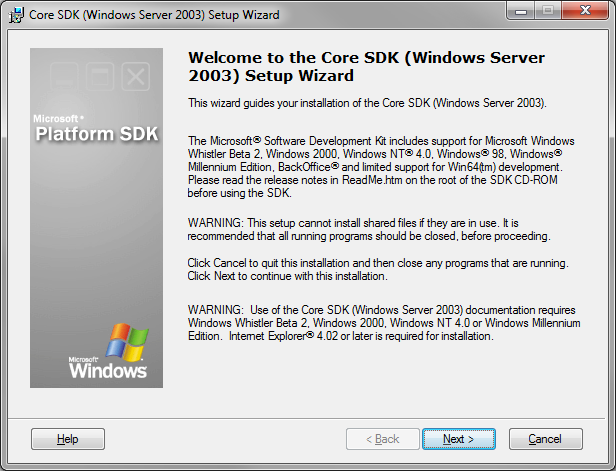 Step 3: Create Bat File to Launch Visual StudioAfter you have installed the Platform SDK, create a bat file to source the correct environment variables and launch Visual Studio. Example:call "C:\Program Files (x86)\Microsoft SDK\SetEnv.Cmd" /X64 /RETAIL start "" "C:\Program Files (x86)\Microsoft Visual Studio\Common\MSDev98\Bin\MSDEV.EXE" /useenv In this example, "C:\Program Files (x86)\Microsoft SDK\" is the directory where I installed the Platform SDK and "C:\Program Files (x86)\Microsoft Visual Studio\" is where I installed Visual Studio 6. Note that the first line in the bat file references "SetEnv.Cmd". I obtained a copy of a "SetEnv.Cmd" file from a newer version of the Platform SDK (which didn't work with Visual Studio 6). If you do not have a "SetEnv.Cmd", feel free to download this one and copy it to the SDK root directory. Run the bat file to open Visual Studio configured to build x64 applications. To actually build an x64 bit application, you will need to update a couple project settings. Step 4: Create a New Visual Studio ProjectRun the bat file created in the previous step to open Visual Studio 6. Go to File->New and select the Project tab. Select the type of project you want to create and specify project name/path: 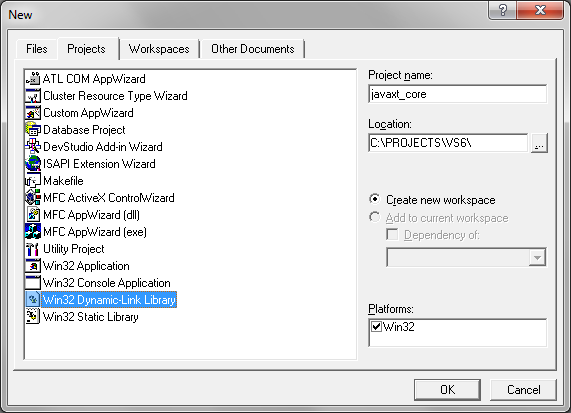 Step 5: Create a New Build ConfigurationGo to Build->Configurations->Add... to create a new 64-bit build configuration. In this example, we will create a configuration called "Release AMD64" copying settings from "Win32 Release".
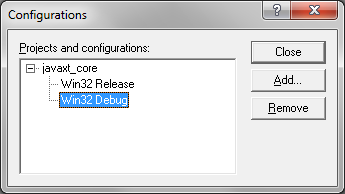
Step 6: Select Build ConfigurationGo to Build->Set Active Configuration... and select the your new configuration. 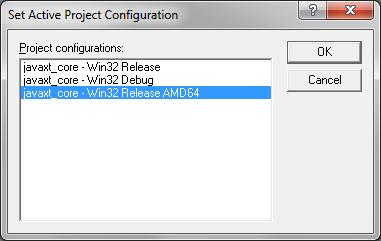 Step 7: Update List of LibrariesOpen the Project Settings (e.g. Project->Settings...). In the "Link" tab, remove "odbc32.lib" and "odbccp32.lib" and add "bufferoverflowU.lib". See link errors below for more information. 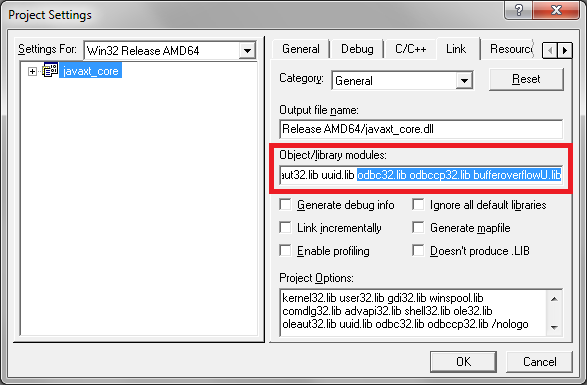 Step 8: Add "/machine:AMD64" Link OptionOpen the Project Settings (e.g. Project->Settings...). In the "Link" tab, append "/machine:AMD64" to the options list. Note that the environment will not allow the option "/machine:I386" to be removed, so as long as "/machine:AMD64" comes after it, everything is fine. 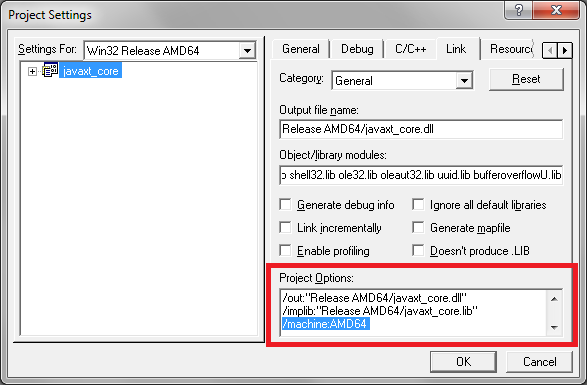 Step 9: Debug Settings (Optional)In all configurations for the AMD64 platform, in the "C/C++" tab, in the "General" category, make sure that if any debug info is enabled, it is not "Program Database for Edit and Continue". In the debug configuration the AMD64 platform, in the "C/C++" tab, it is a good idea to add the option /Wp64 to the options list to help to make the source code 64-bit compliant.Step 10: Build!Build your app using the "Rebuild All" option. If all goes well, you should have a big smile on your face :-)Common Link ErrorsHere's a short list of link errors you might run into when building your x64 application using the Platform SDK.
ConclusionSetting up a x64 build environment for Visual Studio 6 is pretty straightforward. The hardest part for me was finding the right SDK and setting up the environment variables. Hopefully, this article will help you get up and running quickly.References: |
|||